

An ’80s-style art project featuring ripped paper
Looking for an easy ’80s DIY project? Try a little art piece that can be completed in 30 minutes with the help of ripped paper and glue. This weekend I found myself in need of a modern minimalist piece to anchor a living room display of framed art. Desiring a picture that channeled ’80s modern design (think “office building chic”), I decided to begin a 3-color DIY project based on a large piece I’d briefly spotted in the 1991 film Regarding Henry starring Harrison Ford. Could my last-minute endeavor be more random? Read on for the details…

An ’80s DIY art project
- Begin with three pieces of art paper that are equal in size. If your paper selections aren’t the same size, simply trim them down. My three pieces were olive green, light blue and orange.
- One piece of paper will be your “canvas,” to which you will eventually glue the two other ripped pieces. For my picture, the orange piece was my anchor, and you can see how a small orange line “shows through” after the ripped pieces have been glued (above, right).
- Once you’ve decided which piece will be your anchor/canvas, take one of the other pieces and make sure it is positioned on a flat surface. Use a pencil to draw a wobbly diagonal line from the top left corner of the paper to the bottom right corner.
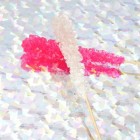
- Now use that line as a guide, and rip your paper, trying to follow the line as much as possible. In the image above (left), you can see the ripped edge of the blue paper. HINT: don’t rip directly on the line. Rip under the line. It’s better if the ripped piece is smaller than what you’d originally drawn. That way, when you glue it to the anchor paper, some of the underlying color will show through (as you can see with the orange line in the image above).
- Now place your first ripped paper piece on top of your last piece of paper. Use the ripped edge as a guide, and draw a wobbly diagonal line on the final paper piece. Rip your third piece of paper, again trying to rip under the line you’ve drawn so the ripped piece is a bit smaller. In other words, your two large ripped pieces should not fit together perfectly. There should be some space between them so the paper underneath will show through once you glue them down.
- Now you have two large ripped pieces! If you need to flip one of them over, do so at this time. They should fit together. Using an adhesive, glue the ripped pieces to your anchor/canvas piece, making sure there is room in between them so the color of the anchor paper shows through. I used Elmer’s glue, which I dabbed with my fingers to prevent puckering, and I only glued the paper at the corners and a few other spots (again, to prevent dimpling). Some people prefer smoother adhesives, such as Mod Podge.
- Now frame your art and enjoy it!
Thanks for joining me for my impromptu ’80s DIY project. Note: this project also works well with smaller pieces of paper–create several art pieces for a grouping of pictures that features a range of hues. If you like the art but don’t want to commit 100%, use it as a backdrop for your next ’80s party. Have a colorful Monday!


Love your blog. Have been following for a few months.
Thanks so much for your comment, Robert! So glad you're enjoying it!
I'm prepping to direct a music video for a friend's goth band Angie's Curse and wanted to set it in the 80's when goth rock was born. I was googling for 80's culture and stumbled on your site. I definately need to create some 80's interior decoration. This project looks like a step in the right direction. Keep up the good work.
Thanks, Ce! I hope the project is helpful! Maybe a little red, gray and black will give it a goth touch ; – ) The video sounds very cool–Let me know if there's a way to watch it online when it's completed!
I just saw this, and now I’m going to the craft store to get some really colorful (neons included) paper, and give this a try. This looks great!!! I have some empty wall space, and this would be a great way to fill it. Or I might experiment a little, and actually create something like this from paint on the wall directly. Thank You!!!