
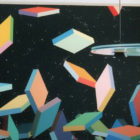
An '80s-style paper landscape
Today’s DIY project celebrates the kitschy yet modern glory of ’80s landscape art! In fact, 1980s Southwestern art has experienced a recent comeback, with savvy collectors combining formerly-dated pieces with newer art selections for an updated look. Our project shows you how to create your own landscape using art paper, glue and a little imagination.

Family Ties matriarch Elyse Keaton stands near an '80s landscape painting
The inspiration for today’s project can be seen in the image above. Family Ties’ Elyse Keaton (played by Meredith Baxter) interviews at an architectural firm whose office is a showroom for ’80s modern style. The landscape artwork in the background couldn’t help but grab our attention! For more on 1980s office style a la Family Ties, click here. Now on to the DIY project…
What You’ll Need:

Art paper in '80s hues
- art paper in ’80s Southwestern hues (hello peach, blue and berry tones!); choose acid-free paper to prevent fading
- adhesive, such as Elmer’s glue or Mod Podge
- A sponge brush or paintbrush for spreading the adhesive onto the paper
- a frame for the finished product (optional)
How It’s Done:

Creating an '80s paper landscape
Step 1: Begin by selecting a piece of background paper–the piece to which you’ll glue the other layers of landscape. If you plan to frame the artwork, make sure the background paper neatly fits your frame.
Step 2: Select a horizontal or vertical orientation for your artwork. Hint: many horizontally-oriented paper landscapes have a broad, grand appearance that is oh so fitting for this style of art.
Step 3: Cut the remaining pieces of paper so they perfectly fit the width of the background paper. Now all you will have to do is rip your art paper, free of concern over whether or not it will fit into your landscape!
Step 4: Using mountainous landscape as your inspiration, begin ripping! As shown in the image to the right, it can be helpful if you use your free hand to stabilize the paper and keep the rips and dips from getting out of control. After all, the paper will not rip past the point where your finger rests! Try to keep each layer in one “piece.”
Step 5: Glue or stick each layer to the background paper. Start with the highest layer. Don’t worry if it doesn’t fill the entire height of your background. After all, you’ll be adding layer after layer below it! If using a liquid adhesive such as Elmer’s glue or Mod Podge, use a paintbrush or sponge brush to thinly spread the glue. This will prevent puckering.
Step 6: Once the glue has dried, frame your artwork and enjoy!

An '80s-style paper landscape
Why It Works:
By deliberately using striking color combinations, this artwork can add a much-needed point of interest to a room. Selecting ’80s tones in bold blues, peaches, mauves, purples and teals cheekily revives a style of art that was once considered outdated. The simple, modern landscape formations can’t help but look contemporary. Plus, creating this art is so darn easy and fun!


This is beautiful and very easy and cheap. I am in the planning stage of making an 8'x5' bulletin board and want to make a bridge over a canyon with blue water down below. Thanks for giving me a new way to think. The inside of the canyon wall will be dark brown and I am looking for ideas on how to use paper to add some ruggedness to it (grays and light browns?). Do you have any ideas?
Hi There–
I'm sorry I wasn't able to reply sooner! My guess is that your bulletin board is completed by now. Were you happy with the result? Your idea for adding grays and light browns sounds like a great way to give the piece dimension. The ripped paper in strips would work well for texture, even on the inside of the canyon wall. I hope it turned out just the way you wanted it to! Thanks for writing.